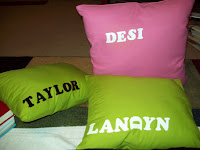
So, I am always looking for accent pillow...for my sofa and love seat for the kids to sit on while reading and playing and for everyones beds. But, when you go to the store its hard to find a pillow for under 5 bucks and pieces and the nice looking ones end up in the 10 dollar range or more.....
Now, I also do not have a ton of time. I run a preschool, have kids I have for over night care and my own family and home to tend to. So, sewing all the time is a bit out of the question as well...don't get me wrong I love to sew but I tend to find very little time to pull everything out and actually do it.
So, here's what I did. I took some fabrics I've had forever and even some old curtian shams I had from a garage sale. Gathered it all up...I cut different size squares....to add variety into the pillows.
Then i got some hem tape. This is generally used for heming and small other things but after some tessting I found it works perfectly. I don't need pillows that will last a lifetime...as I like to change things up often...but a good 6 months is great!
Materials Needed: fabric, adhesive hem tape, iron, scissors,

So, here's how to do it.
1. Take your cut pieces of fabric and iron set to the cotton setting. Measure and tear or cut the heat tape to cover all sides leaving a small opening to turn the pillow inside out and stuff when done. See pic in #2
2. lay the heat tape as directed on fabric as you see here.

3. Fold over the piece of Fabric so that your fabric is now covering eachother. Then iron along the areas you put the tape on. Some fabric you can see the tape has bonded as it looks wet where you have ironed and other you may not be able to.


4. When done set aside and let sit for about 5 minutes. Then tunr the pillow inside out. Check the areas to ensure you got all of the areas with no gaps or holes.

5. Now stuff with stuffing of choice. I did a normal poly stuffing. Stuff kinda thick....harder than you'd normally want as after a few times of being used they will loose some of that stiffness.


6. When done stuffing, take your stuffing hole and fold the materials in...making it even with the other hems....place hem tape on the fabric...then set down...and iron really well. I noticed if you dont put something weighted...like 2 books on the hem while it cools it tend to pull apart since its stuffed now. I used to large children books for just a little weight and it worked great!


And thats it!! you can make all kinda and sizes...shown are many I made....now sewing would of taken a while. I did this in my spare time...each pillow taking about 20 minutes or less depending on size...and got the kiddos involved by allowing them to carefully stuff them...and they loved it.
Now for an even more fun affect you can buy iron on letters or images and add them to them as well...as shown below... I did the childrens names on them and they found that to be wonderful.


Also looking to spice up old pillows...try itron on. Cheap and fun. I personalized our bedroom pillow with our names and rhinstones...lol...what you can't see is on the back of the hubby's it also says love you baby.
Note: You can also use permanet fabric gllue to make these but the sitting and drying time is much long,


No comments:
Post a Comment